
README.md 21 KB
v∆v

A self-hosted print archive and management system for Bambu Lab 3D printers
Features • Screenshots • Installation • Configuration • Usage • Contributing
Features
- Multi-Printer Support - Connect and monitor multiple Bambu Lab printers (H2C, H2D, H2S, X1, X1C, P1P, P1S, A1, A1 Mini)
- Automatic Print Archiving - Automatically saves 3MF files with full metadata extraction
- 3D Model Preview - Interactive Three.js viewer for archived prints
- Real-time Monitoring - Live printer status via WebSocket with print progress, temperatures, layer count, and more
- Print Queue & Scheduling - Schedule prints for specific times with powerful automation:
- Queue multiple prints per printer
- Schedule prints for a specific date/time
- Auto power-on printer before scheduled print starts
- Auto power-off after print completes (with nozzle cooldown)
- Stop active prints with one click
- Drag-and-drop queue reordering
- Smart Plug Integration - Control Tasmota-based smart plugs with automation:
- Auto power-on when print starts
- Auto power-off when print completes
- Time-based delay (1-60 minutes)
- Temperature-based delay (waits for nozzle to cool down)
- Print Statistics Dashboard - Customizable dashboard with drag-and-drop widgets
- Print success rates
- Filament usage trends
- Print activity calendar
- Cost tracking
- Time accuracy tracking
- Print Time Accuracy - Compare estimated vs actual print times
- Color-coded badges (green=accurate, blue=faster, orange=slower)
- Per-printer accuracy statistics
- Dashboard widget showing average accuracy
- Duplicate Detection - Automatically detect when models have been printed before
- SHA256 content hash for exact matching
- Purple badge indicator on archive cards
- "Duplicates" collection filter to find all duplicates
- View duplicate history when viewing archive details
- HMS Error Monitoring - Real-time Health Management System status
- Always-visible status indicator on printer cards
- Green "OK" when healthy, orange/red when errors detected
- Severity-based coloring (fatal, serious, common, info)
- MQTT Debug Logging - Built-in debugging tool for printer communication
- Start/stop logging with one click
- Real-time message capture with auto-refresh
- View incoming and outgoing MQTT messages
- Expandable JSON payloads for detailed inspection
- Filament Cost Tracking - Track costs per print with customizable filament database
- Photo Attachments - Attach photos to archived prints for documentation
- Automatic finish photo capture when print completes (via printer camera)
- Manual photo uploads
- Print Metadata - Rich metadata extracted from 3MF files:
- Print time estimate and actual time comparison
- Filament usage (grams) and type
- Total layer count and layer height
- Nozzle/bed temperatures
- Multi-color support with color swatches
- Failure Analysis - Document failed prints with notes and photos
- Project Page Editor - View and edit embedded MakerWorld project pages with images, descriptions, and designer info
- Cloud Profiles Sync - Access your Bambu Cloud slicer presets
- File Manager - Browse and manage files on your printer's SD card
- Re-print - Send archived prints back to any connected printer
- Dark/Light Theme - Easy on the eyes, day or night
- Keyboard Shortcuts - Quick navigation with keyboard shortcuts
Screenshots
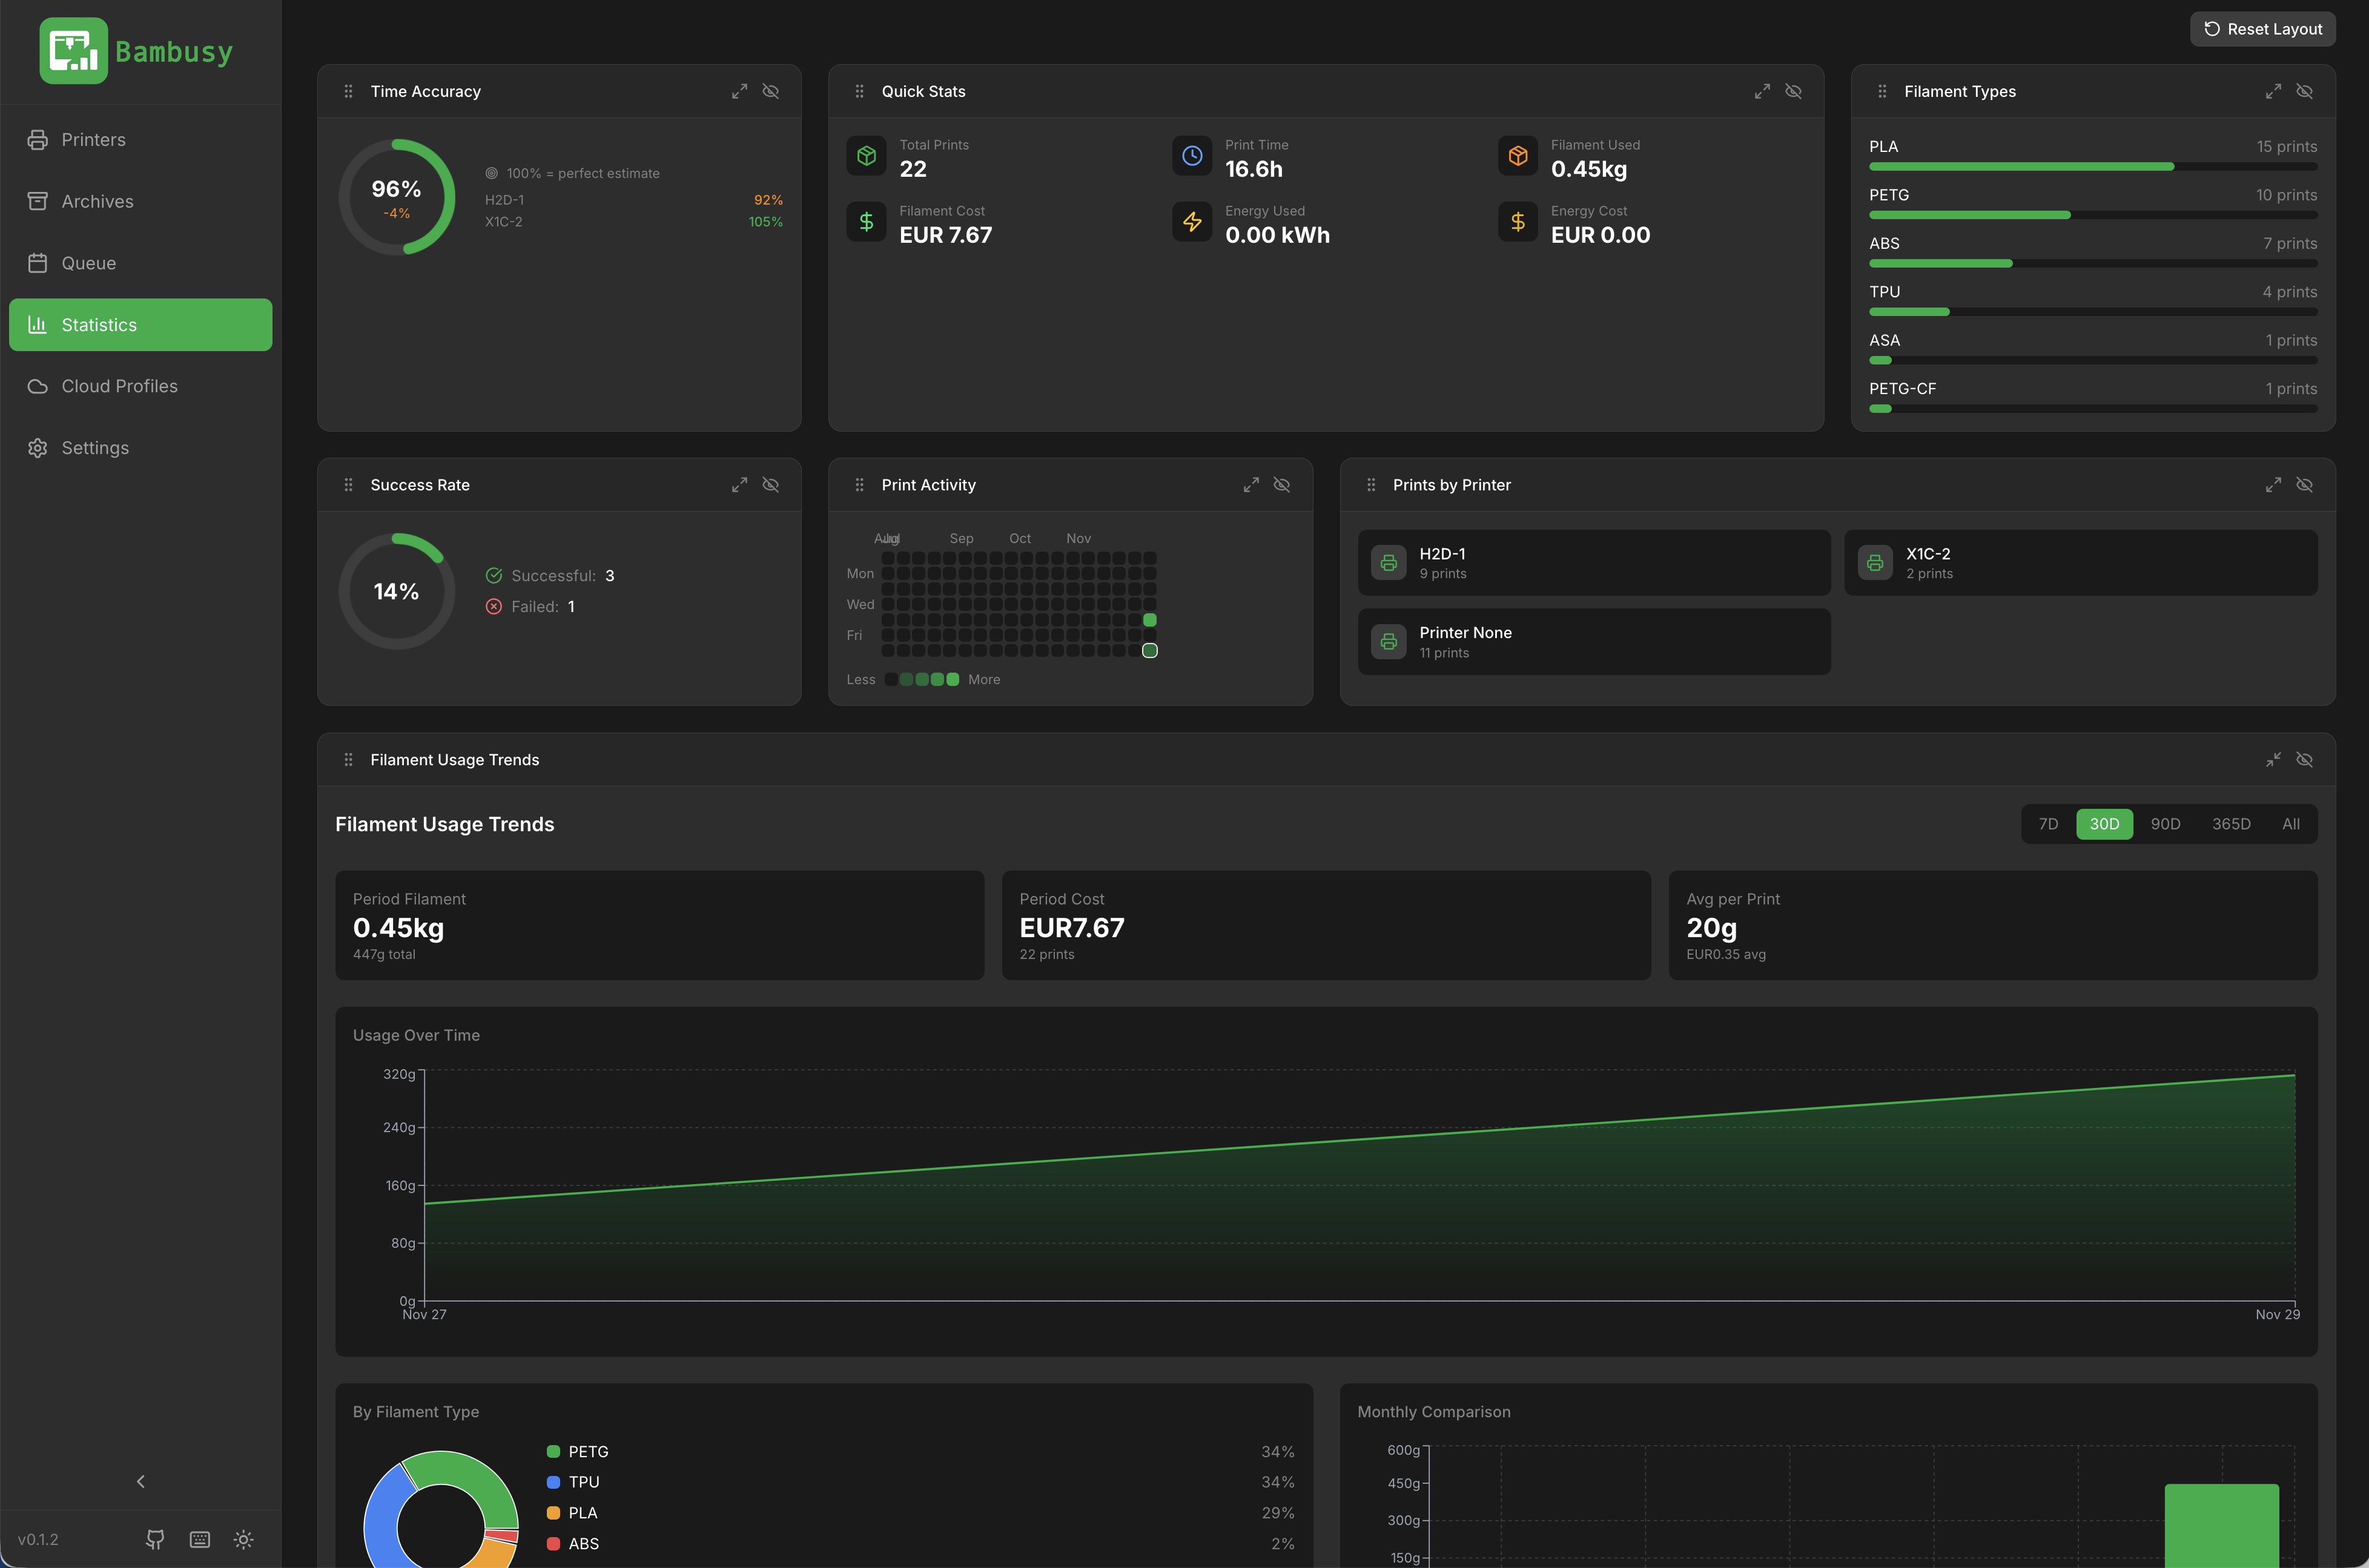
Customizable Dashboard with drag-and-drop widgets
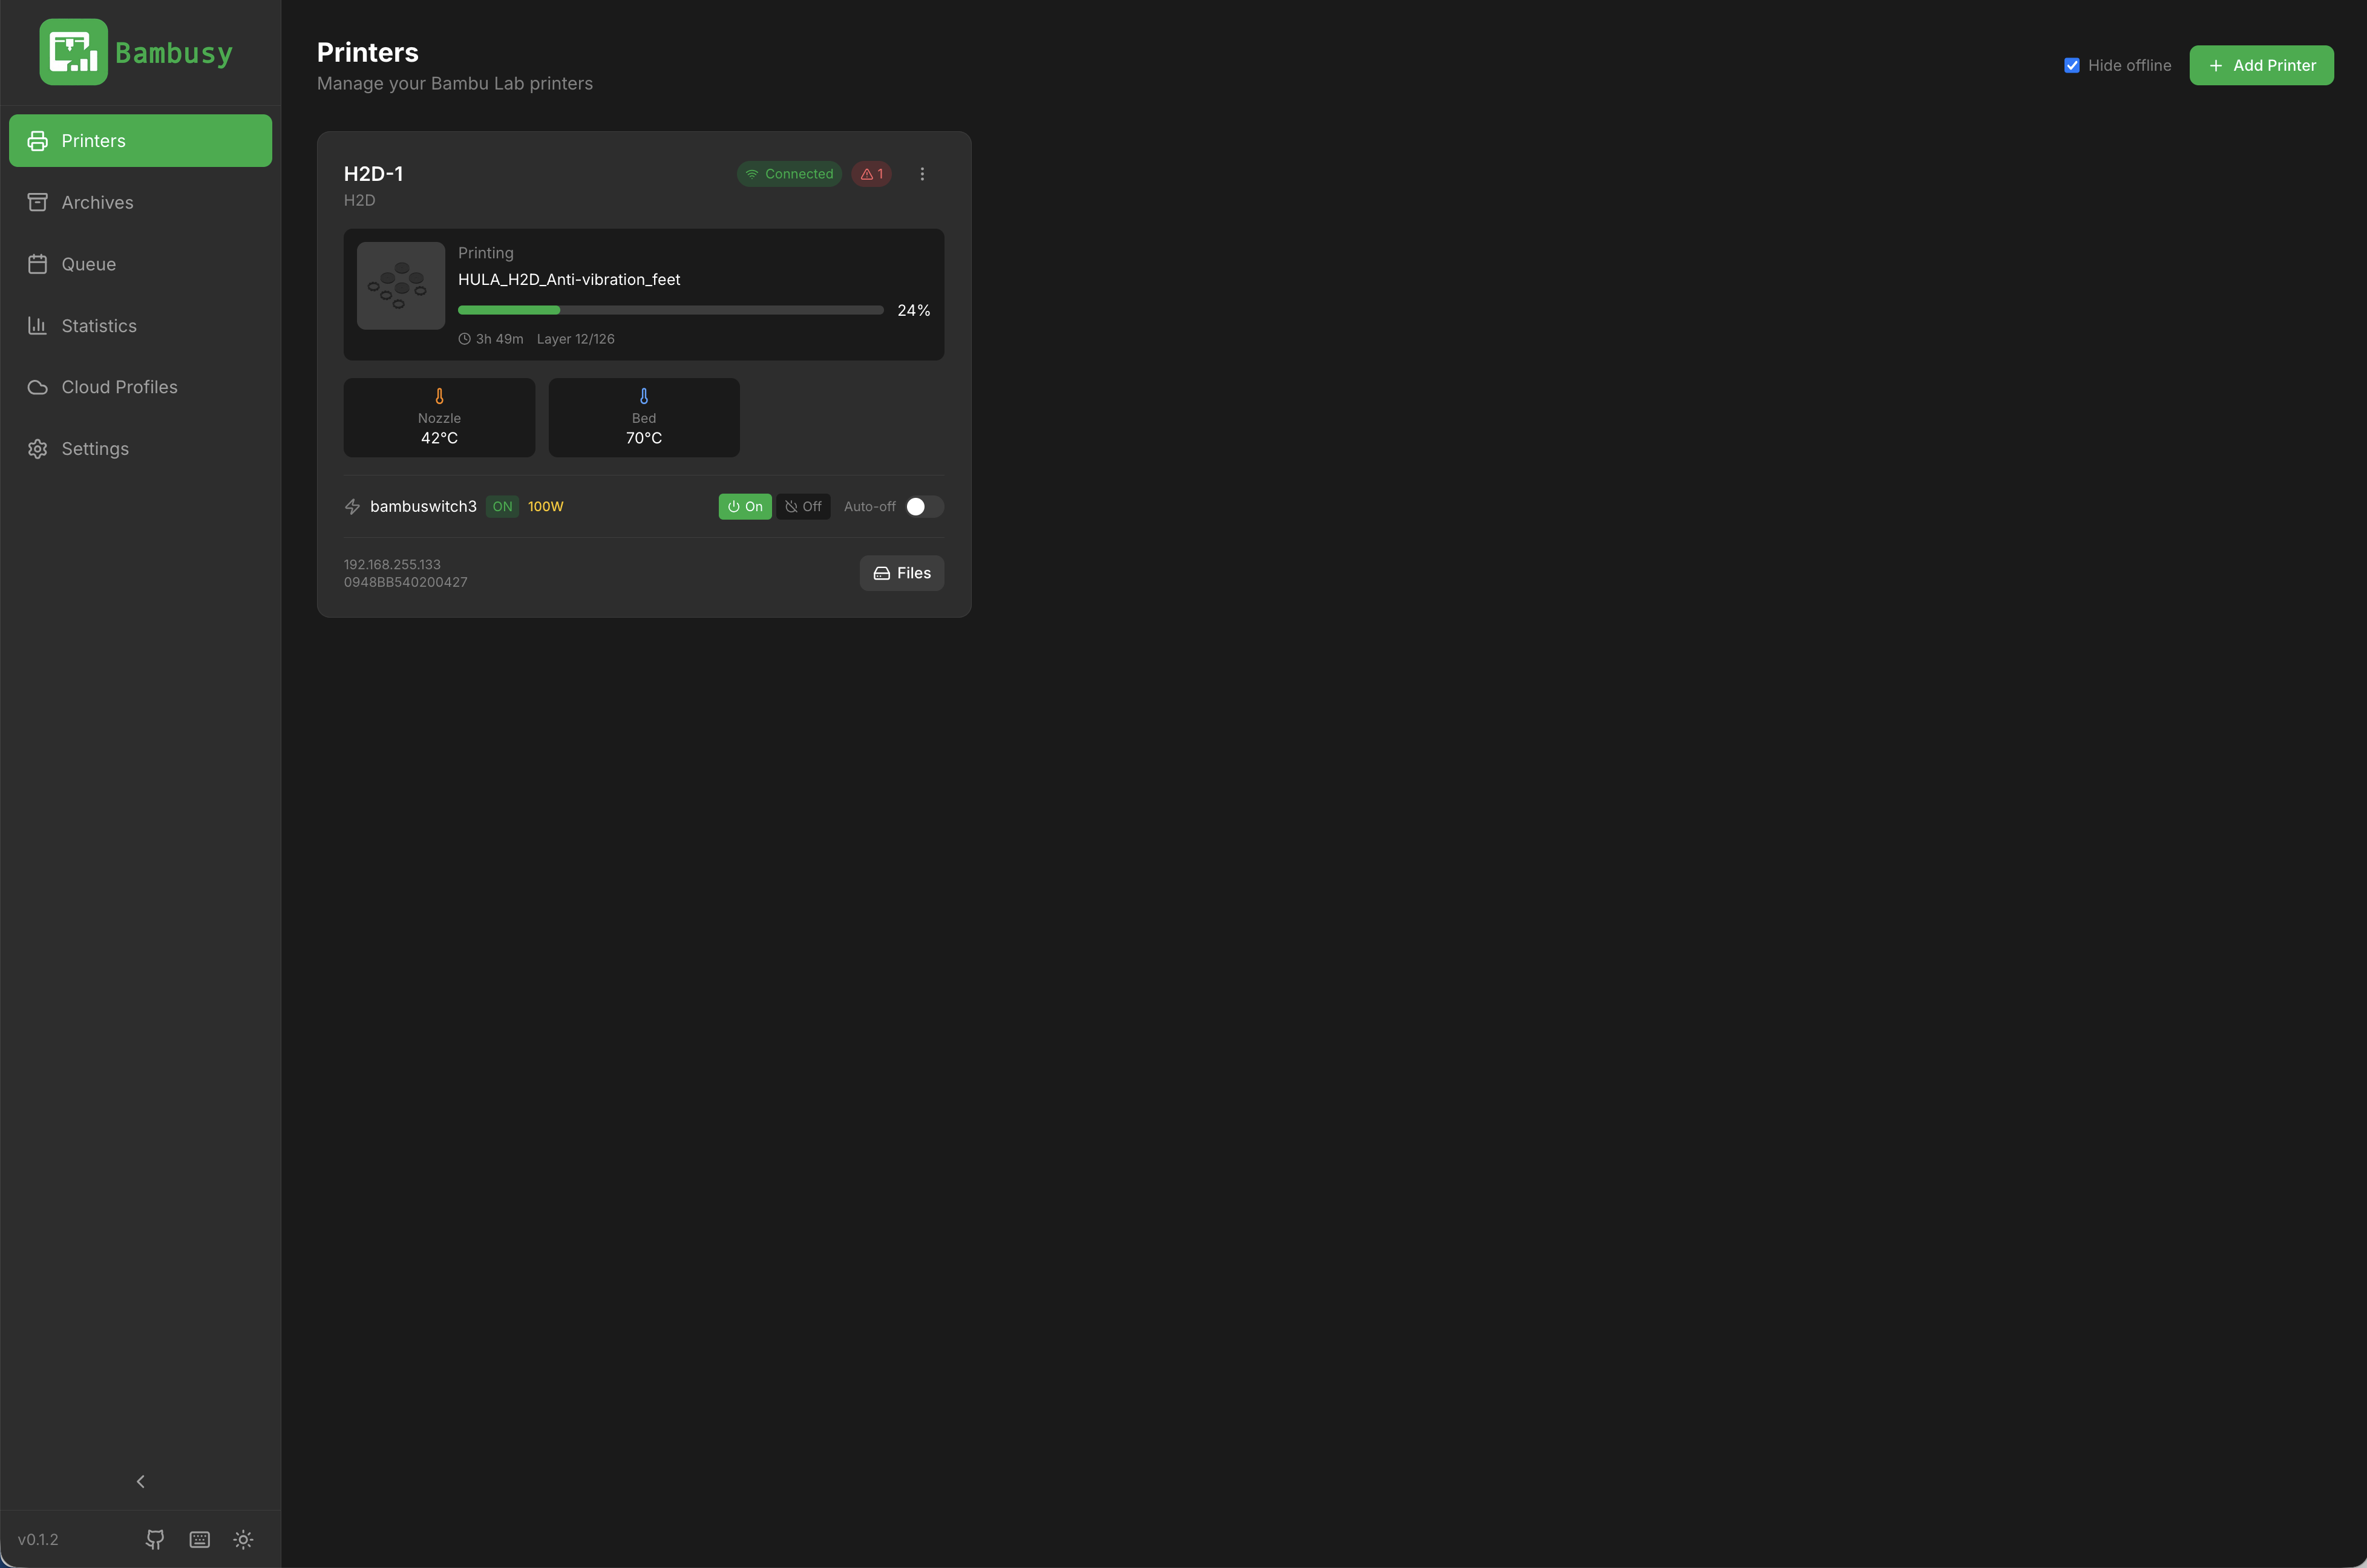
Real-time printer monitoring
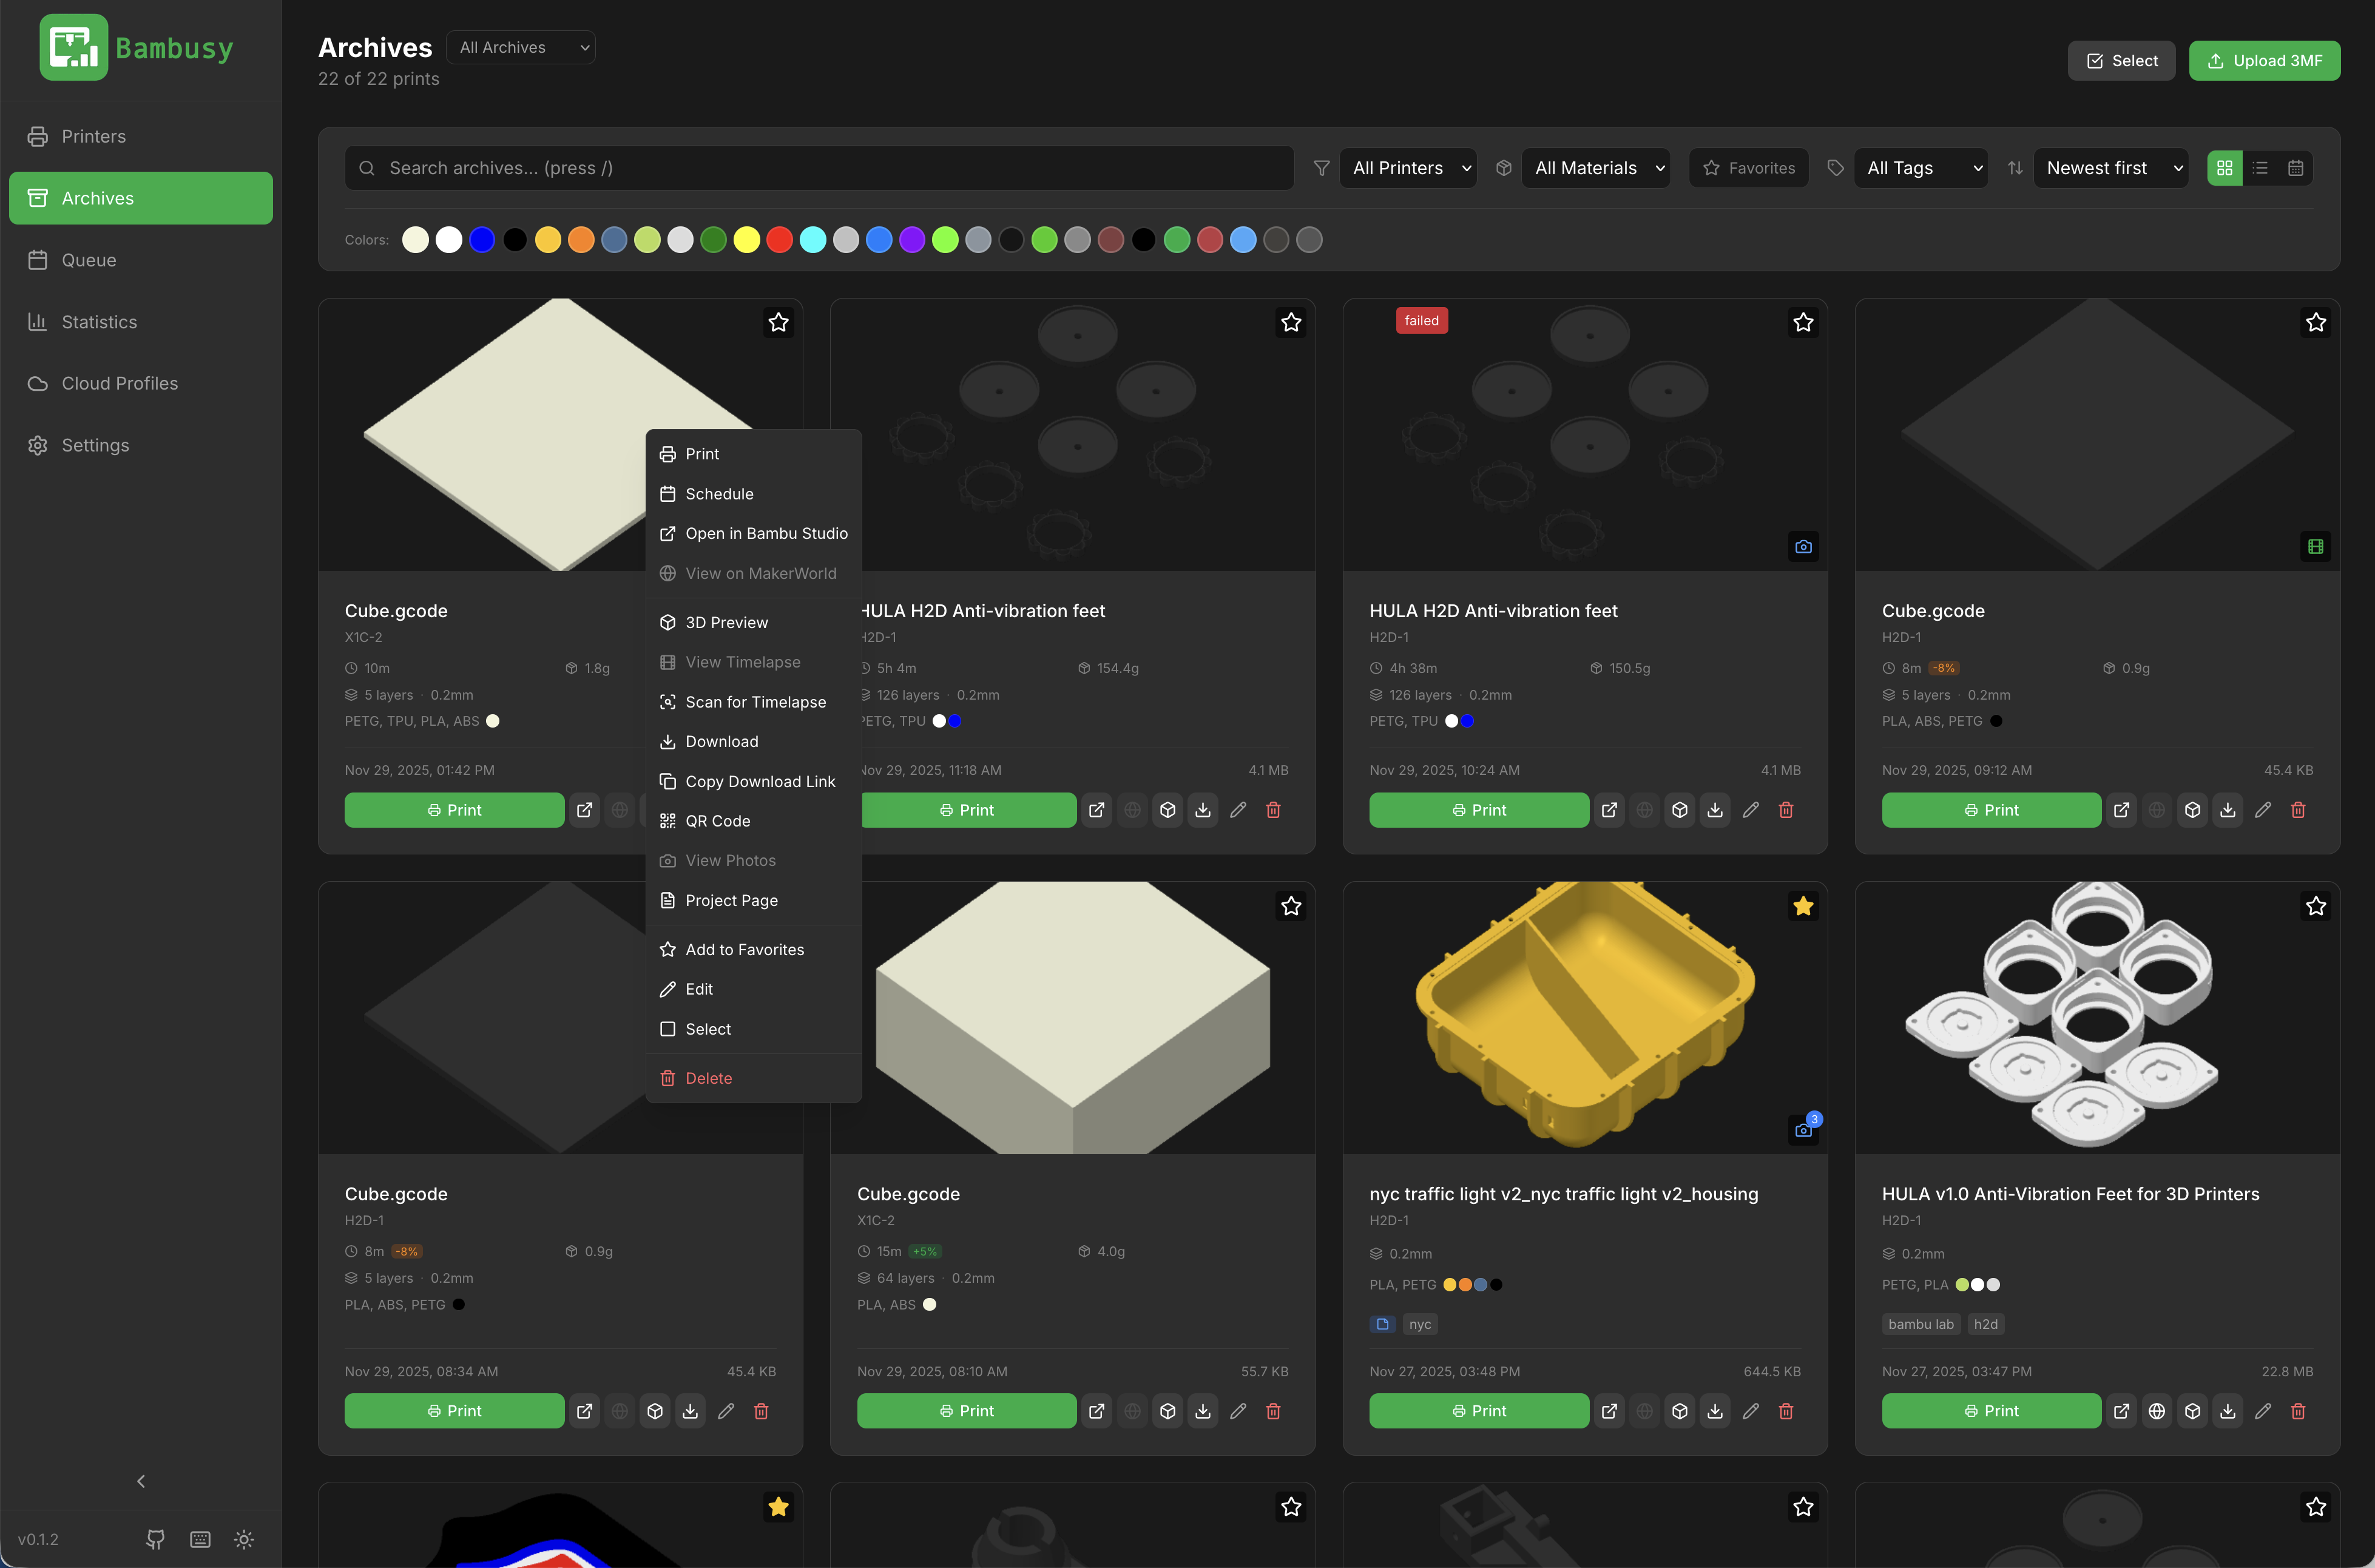
Print archive with grid and list views
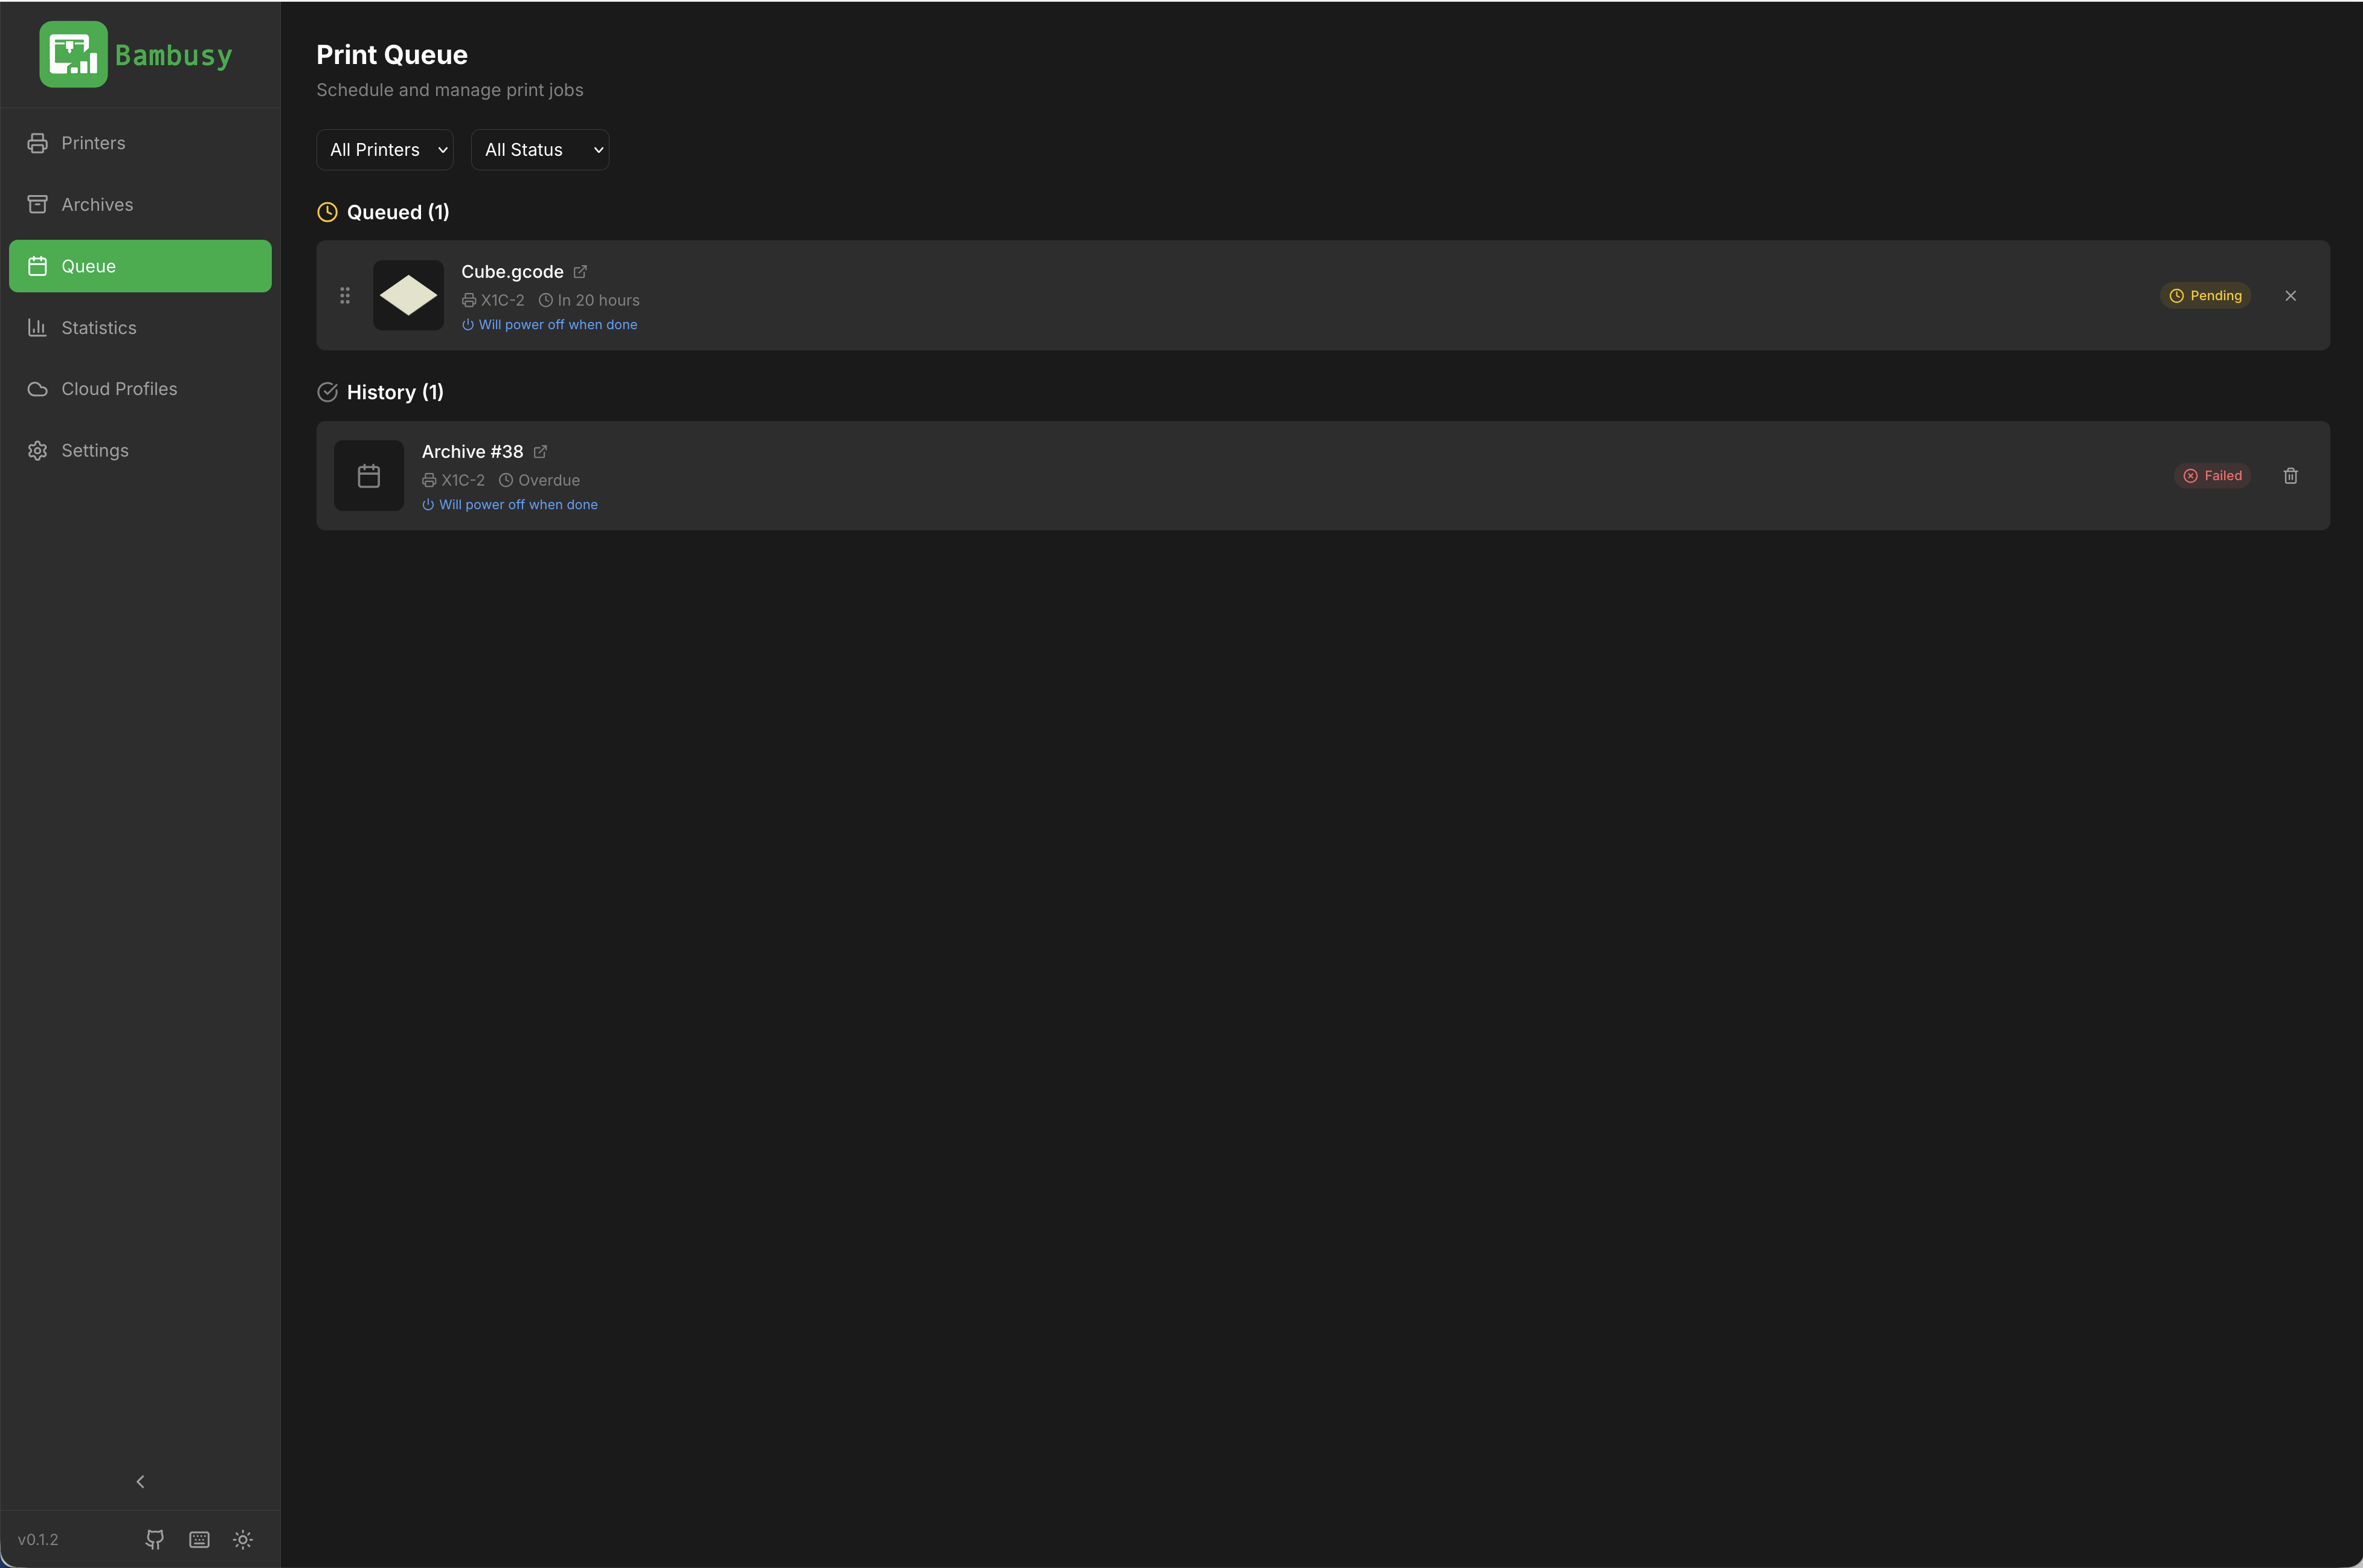
Queueing and scheduling
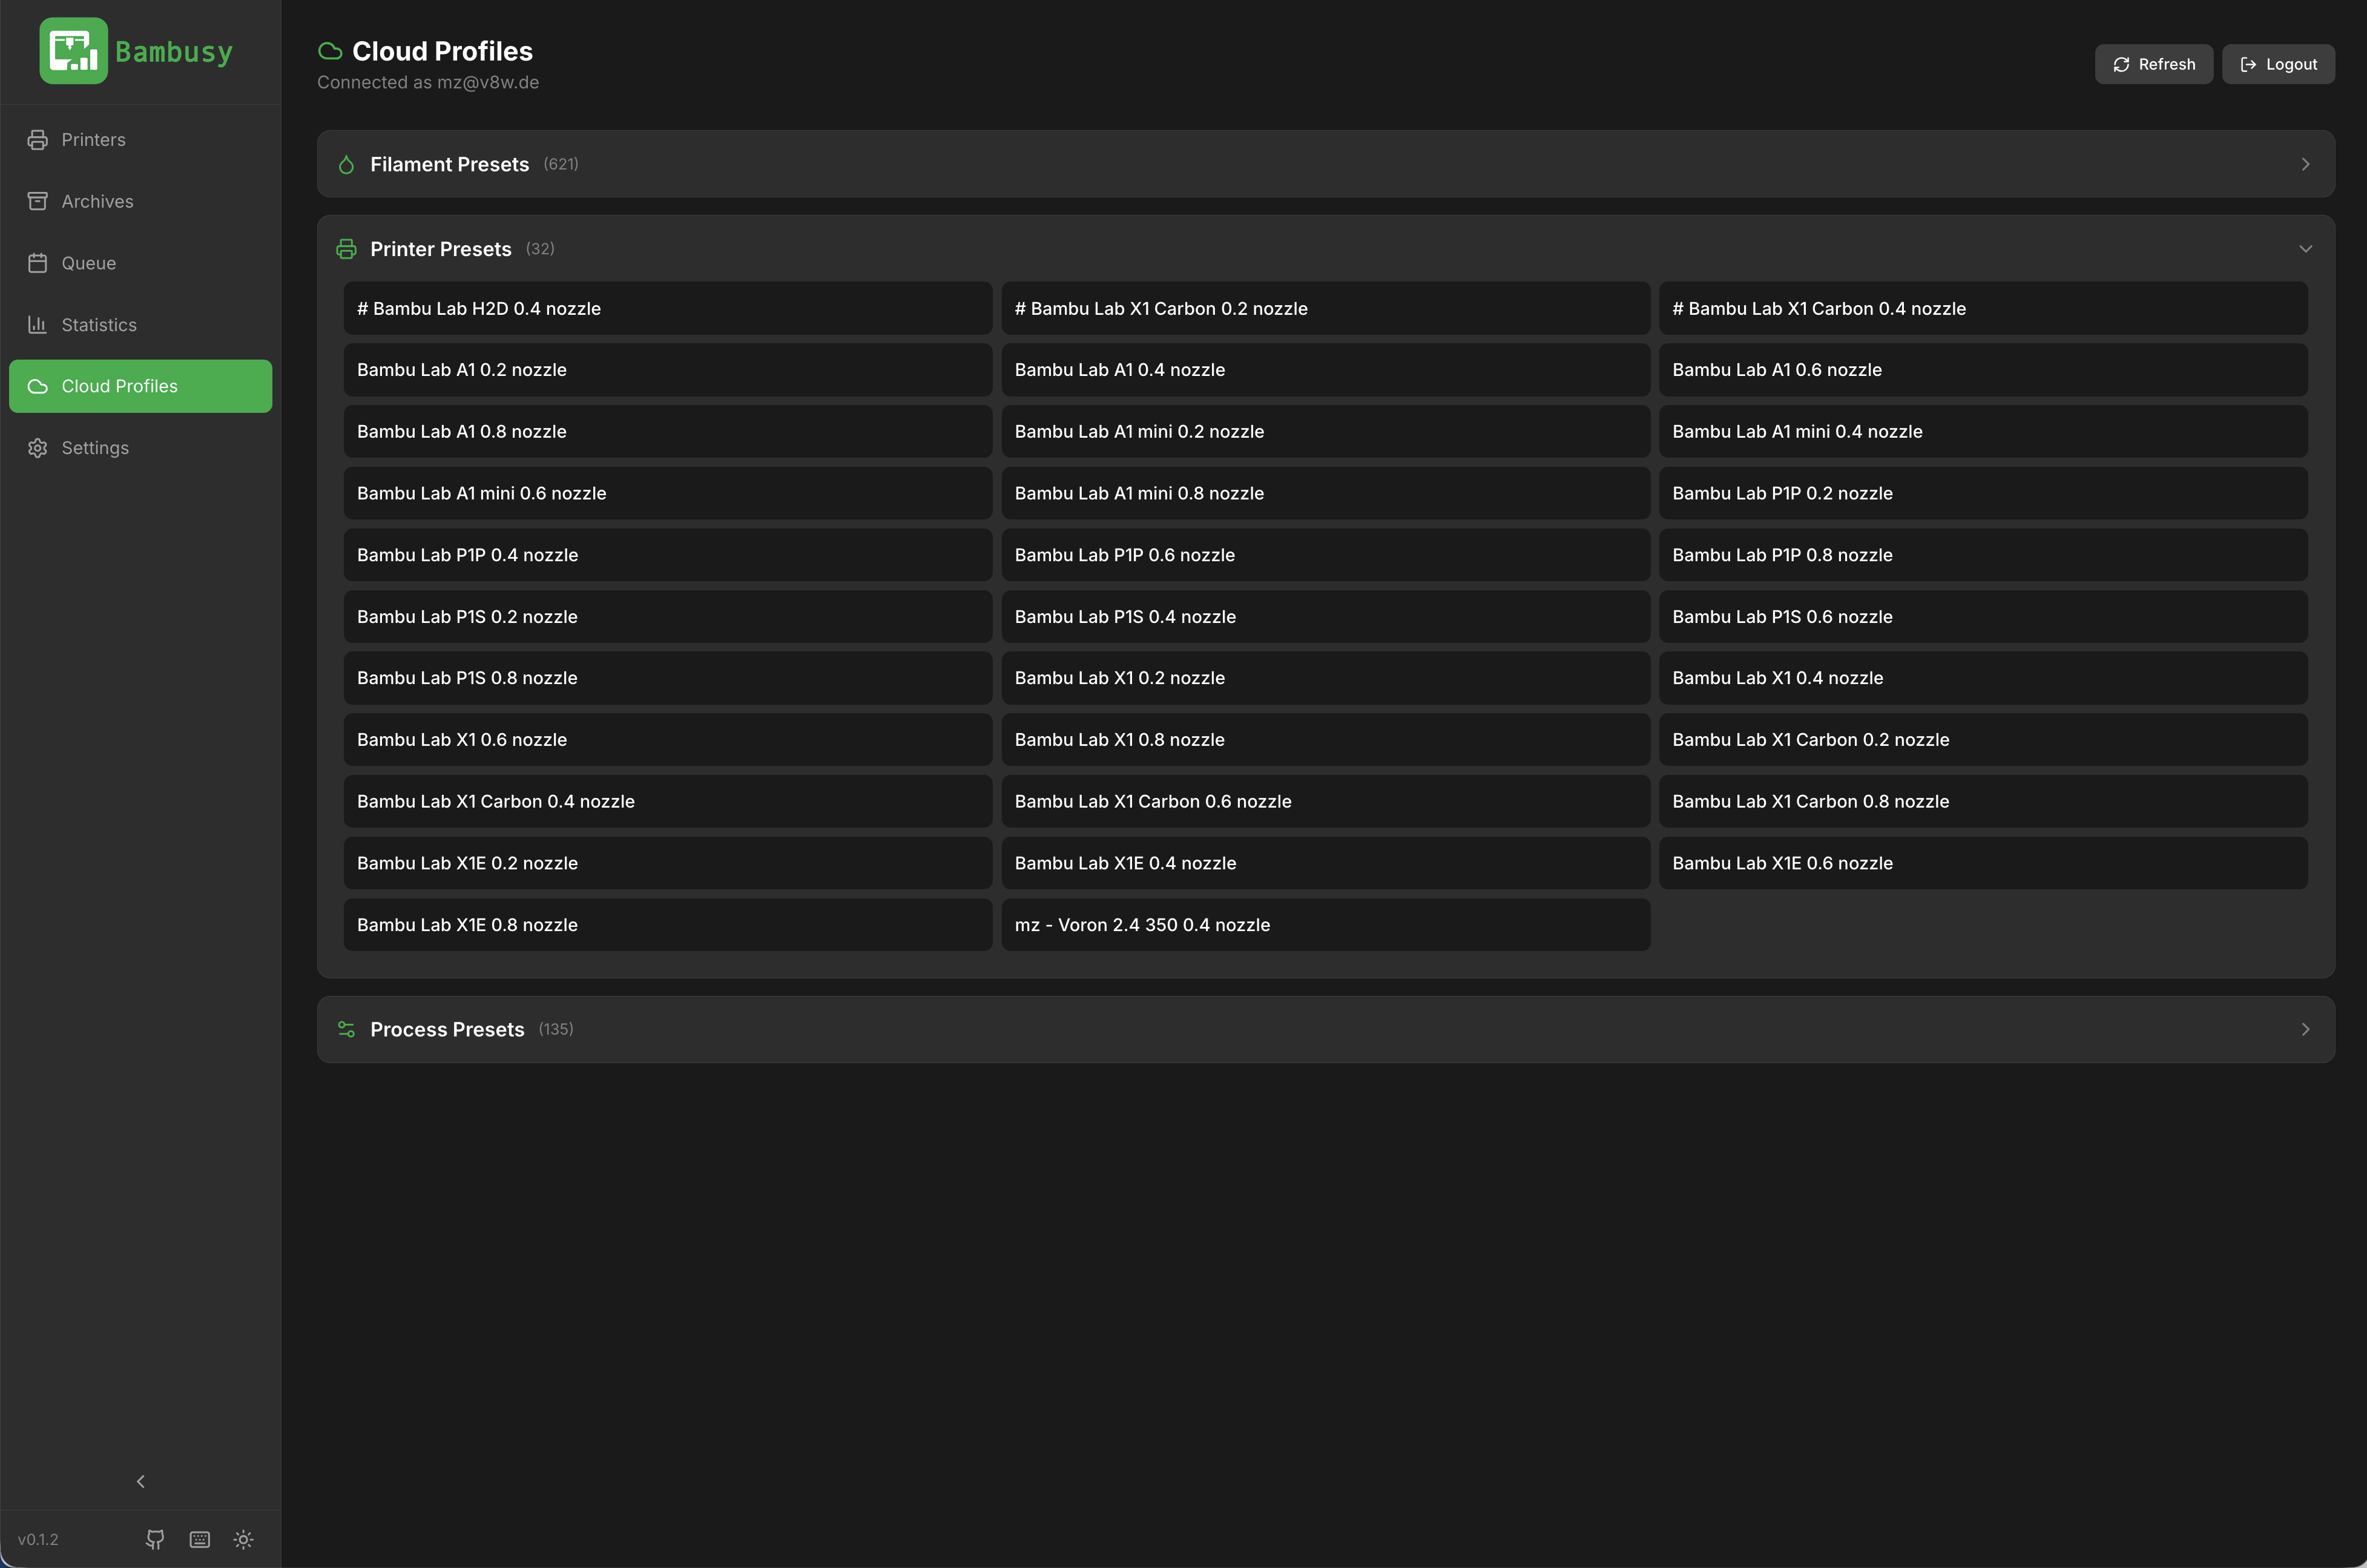
Cloud Profiles
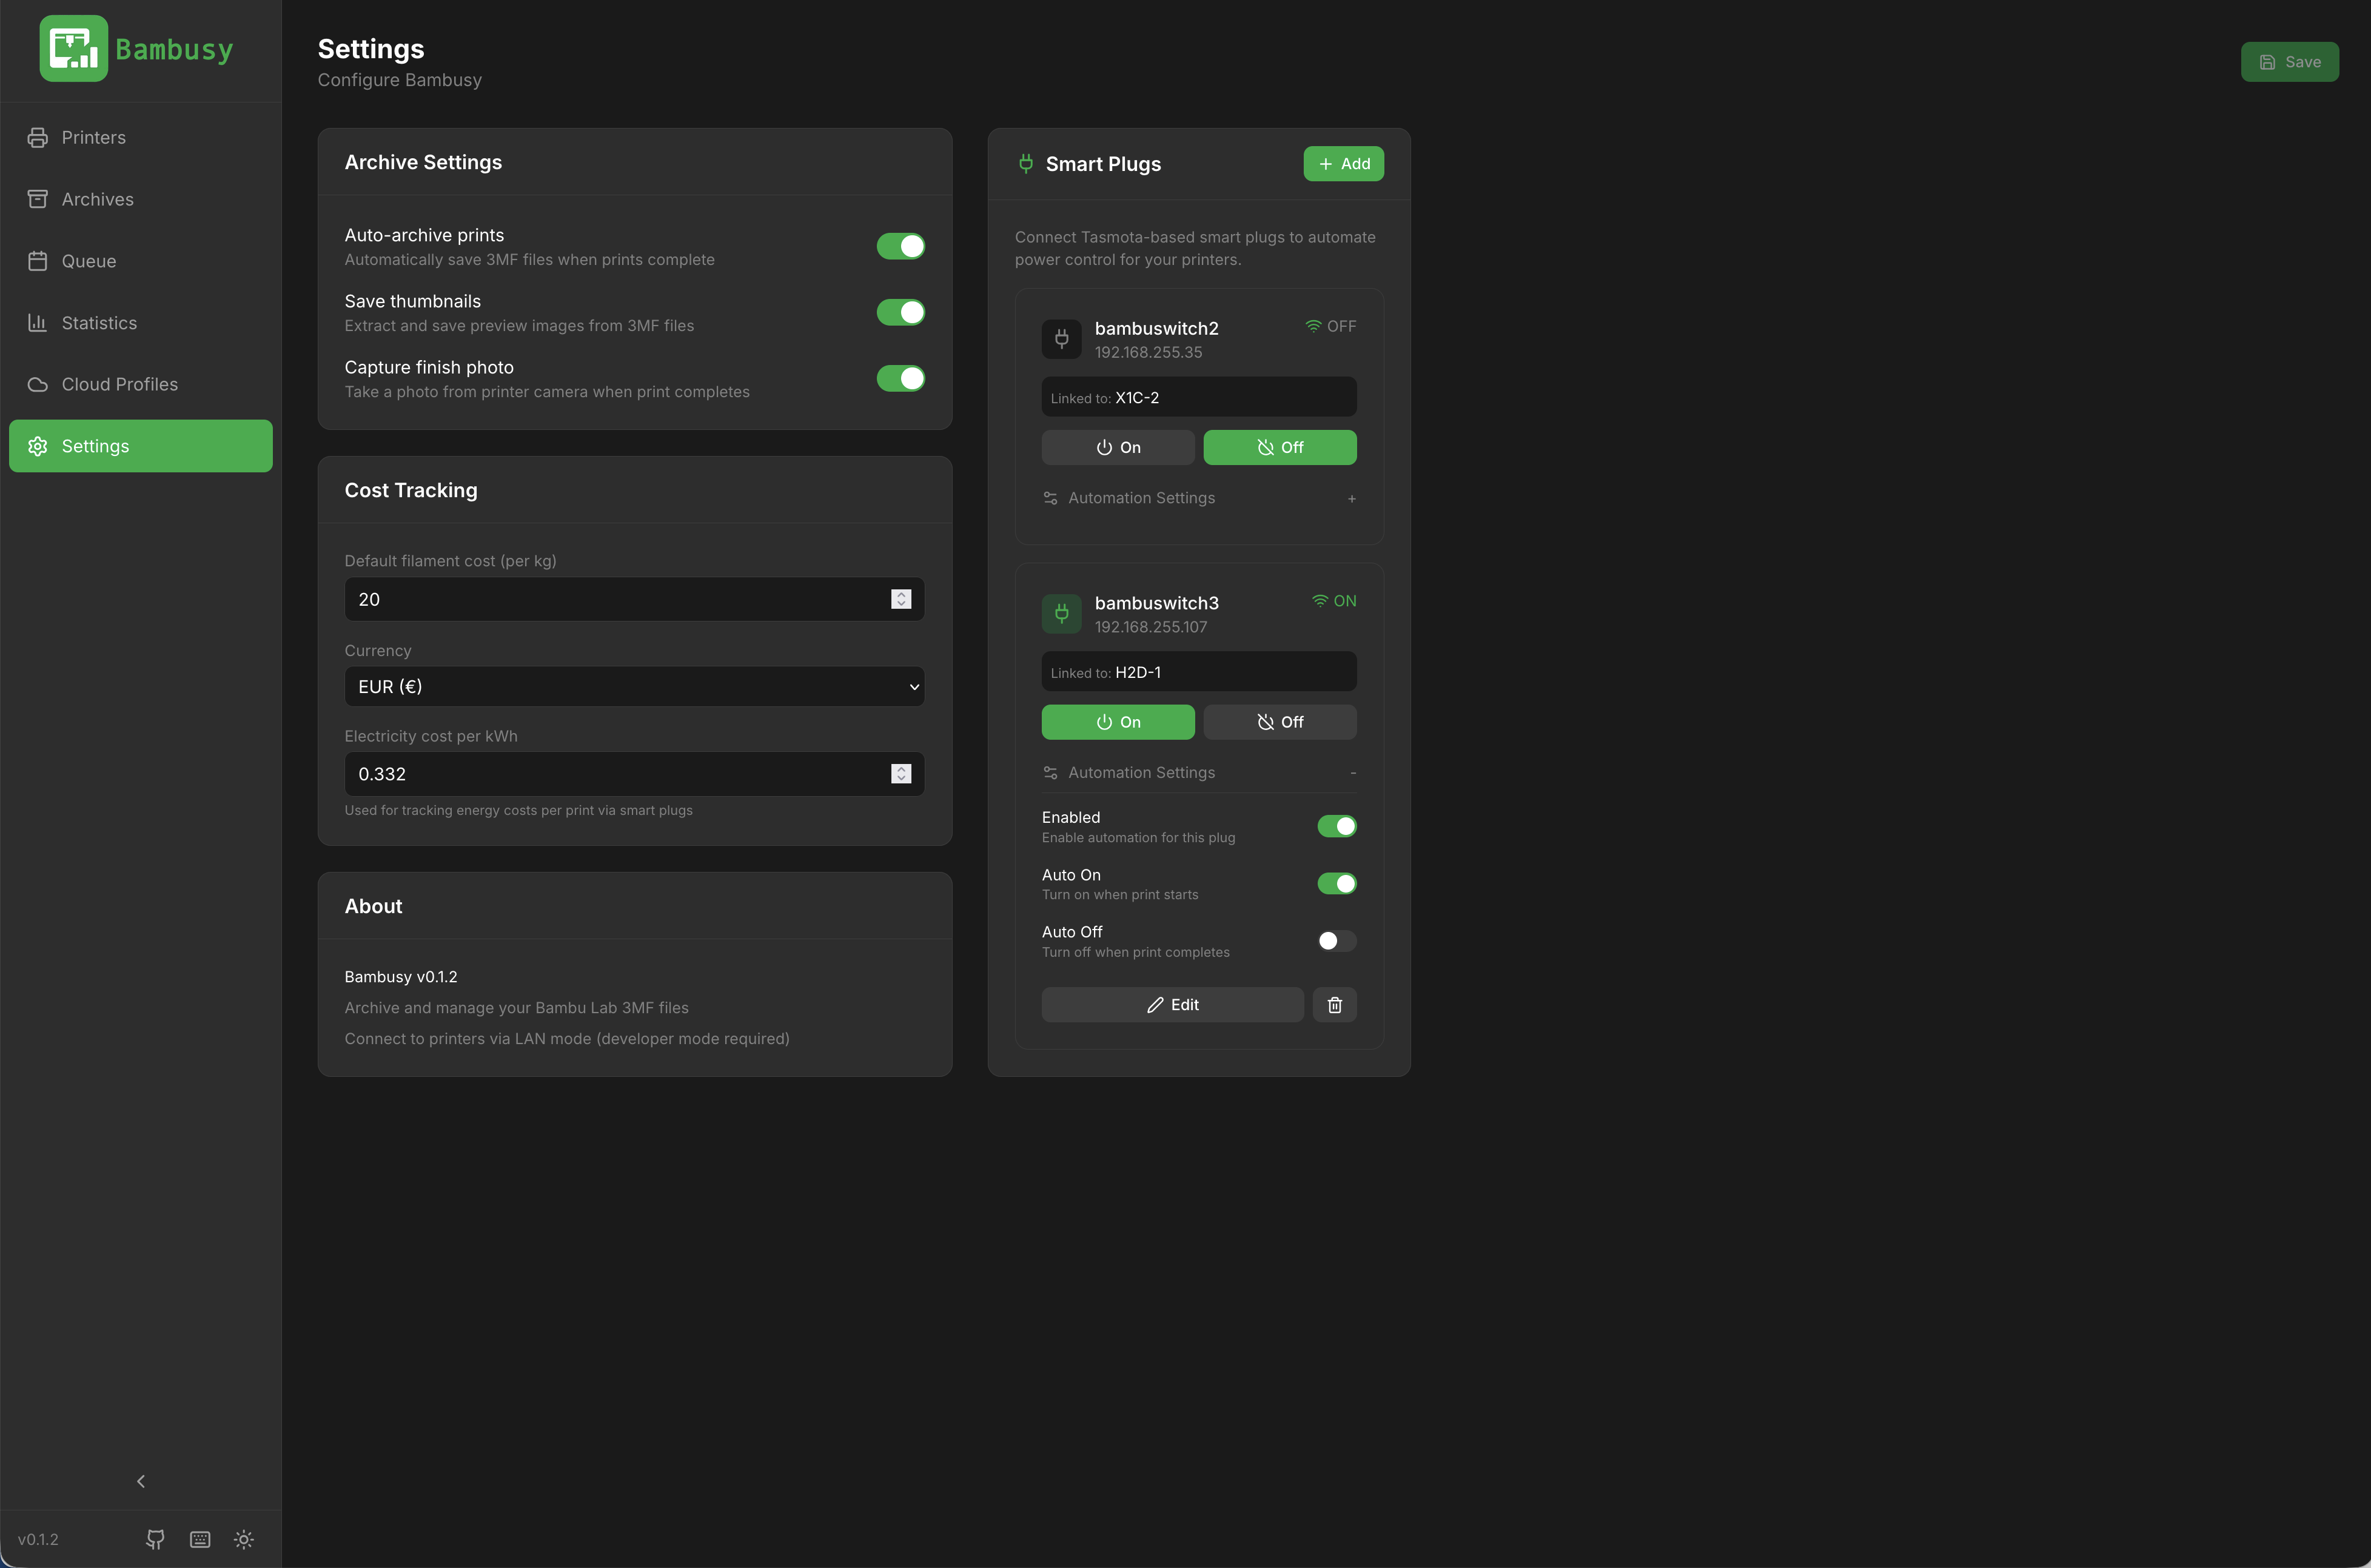
Settings
Requirements
System Requirements
- Python 3.10+ (3.11 or 3.12 recommended)
- Node.js 18+ (only needed if building frontend from source)
- Git (for cloning the repository)
Network Requirements
- Bambu Lab printer with LAN Mode enabled
- Printer and Bambusy server must be on the same local network
- Ports used: 8883 (MQTT/TLS), 990 (FTPS)
Supported Printers
- Bambu Lab H2C / H2D / H2S
- Bambu Lab X1 / X1 Carbon
- Bambu Lab P1P / P1S
- Bambu Lab A1 / A1 Mini
Installation
Option 1: Quick Install (Linux/macOS)
# Clone the repository
git clone https://github.com/maziggy/bambusy.git
cd bambusy

# Create and activate virtual environment
python3 -m venv venv
source venv/bin/activate

# Install Python dependencies
pip install -r requirements.txt

# Start the server
uvicorn backend.app.main:app --host 0.0.0.0 --port 8000
Open http://localhost:8000 in your browser.
Option 2: Detailed Install (All Platforms)
Step 1: Install Prerequisites
macOS:
# Install Homebrew if not installed
/bin/bash -c "$(curl -fsSL https://raw.githubusercontent.com/Homebrew/install/HEAD/install.sh)"

# Install Python and Node.js
brew install python@3.12 node
Ubuntu/Debian:
sudo apt update
sudo apt install python3 python3-venv python3-pip nodejs npm git
Windows:
- Download and install Python 3.12 (check "Add to PATH")
- Download and install Node.js LTS
- Download and install Git
Step 2: Clone the Repository
git clone https://github.com/maziggy/bambusy.git
cd bambusy
Step 3: Set Up Python Environment
Linux/macOS:
python3 -m venv venv
source venv/bin/activate
pip install --upgrade pip
pip install -r requirements.txt
Windows (PowerShell):
python -m venv venv
.\venv\Scripts\Activate.ps1
pip install --upgrade pip
pip install -r requirements.txt
Windows (Command Prompt):
python -m venv venv
venv\Scripts\activate.bat
pip install --upgrade pip
pip install -r requirements.txt
Step 4: Build Frontend (Optional)
The repository includes pre-built frontend files in /static. If you want to build from source:
cd frontend
npm install
npm run build
cd ..
Step 5: Run the Application
uvicorn backend.app.main:app --host 0.0.0.0 --port 8000
Open http://localhost:8000 in your browser.
Running as a Service (Linux)
Create a systemd service for automatic startup:
sudo nano /etc/systemd/system/bambusy.service
Add the following content (adjust paths as needed):
[Unit]
Description=Bambusy Print Archive
After=network.target

[Service]
Type=simple
User=YOUR_USERNAME
WorkingDirectory=/home/YOUR_USERNAME/bambusy
Environment="PATH=/home/YOUR_USERNAME/bambusy/venv/bin"
ExecStart=/home/YOUR_USERNAME/bambusy/venv/bin/uvicorn backend.app.main:app --host 0.0.0.0 --port 8000
Restart=always
RestartSec=10

[Install]
WantedBy=multi-user.target
Enable and start the service:
sudo systemctl daemon-reload
sudo systemctl enable bambusy
sudo systemctl start bambusy

# Check status
sudo systemctl status bambusy

# View logs
sudo journalctl -u bambusy -f
Running with Docker (Coming Soon)
docker run -d \
  --name bambusy \
  -p 8000:8000 \
  -v bambusy_data:/app/data \
  -v bambusy_archive:/app/archive \
  maziggy/bambusy:latest
Updating Bambusy
cd bambusy
git pull origin main

# Activate virtual environment
source venv/bin/activate  # Linux/macOS
# or: .\venv\Scripts\Activate.ps1  # Windows PowerShell

# Update dependencies
pip install -r requirements.txt

# Rebuild frontend (if needed)
cd frontend
npm install
npm run build
cd ..

# Restart the application
Configuration
Enabling LAN Mode on Your Printer
To connect Bambusy to your printer, you need to enable LAN Mode:
- On your printer, go to Settings > Network > LAN Mode
- Enable LAN Mode (this requires Developer Mode to be enabled first)
- Note down the Access Code displayed
- Find your printer's IP Address in network settings
- Find your printer's Serial Number in device info
Adding a Printer in Bambusy
- Go to the Printers page
- Click Add Printer
- Enter:
- Name: A friendly name for your printer
- IP Address: Your printer's local IP
- Access Code: The code from LAN Mode settings
- Serial Number: Your printer's serial number
- Click Save
The printer should connect automatically and show real-time status.
Environment Variables
Bambusy can be configured using environment variables or a .env file in the project root. Copy .env.example to .env and adjust as needed:
cp .env.example .env
| Variable | Default | Description |
|---|---|---|
DEBUG |
false |
Enable debug mode (verbose logging, SQL queries) |
LOG_LEVEL |
INFO |
Log level when DEBUG=false (DEBUG, INFO, WARNING, ERROR) |
LOG_TO_FILE |
true |
Write logs to logs/bambutrack.log |
Production (default):
- INFO level logging
- SQLAlchemy and HTTP library noise suppressed
- Logs written to
logs/bambutrack.log(5MB rotating, 3 backups)
Development (DEBUG=true):
- DEBUG level logging (verbose)
- All SQL queries logged
- Useful for troubleshooting printer connections
Example .env for development:
DEBUG=true
LOG_TO_FILE=true
Usage
Keyboard Shortcuts
| Key | Action |
|---|---|
1 |
Go to Printers |
2 |
Go to Archives |
3 |
Go to Statistics |
4 |
Go to Cloud Profiles |
5 |
Go to Settings |
? |
Show keyboard shortcuts |
Dashboard Widgets
The statistics dashboard features draggable, resizable widgets:
- Drag widgets by the grip handle to reorder
- Resize widgets by clicking the resize icon (cycles through 1/4, 1/2, full width)
- Hide widgets by clicking the eye icon
- Reset layout using the Reset Layout button
Your layout preferences are saved automatically.
Archiving Prints
Prints are automatically archived when they complete. You can also:
- Manually add photos to any archive
- Add failure analysis notes for failed prints
- Re-print any archived 3MF to a connected printer
- Export archives for backup
Print Queue & Scheduling
The print queue allows you to schedule prints for later execution with smart automation.
Adding to Queue
- Go to the Archives page
- Right-click an archive and select Schedule, or click the calendar icon
- Choose a printer and optional scheduled time
- Configure options:
- Scheduled Time: Leave empty for "next available" or pick a specific date/time
- Auto Power Off: Automatically turn off the printer when the print completes
Queue Management
- View Queue: Click the queue icon on any printer card, or go to the Queue page
- Reorder: Drag and drop queue items to change print order
- Cancel Pending: Click the X button on any pending queue item
- Stop Active Print: Click the stop button on an actively printing item (with confirmation)
Automation Flow
When a scheduled print is ready to start:
- Power On: If linked to a smart plug, the printer powers on automatically
- Wait for Connection: System waits for the printer to connect (up to 2 minutes)
- Upload & Start: The 3MF file is uploaded via FTP and the print starts
- Monitor: Progress is tracked in real-time
- Completion: When the print finishes:
- Queue item is marked complete/failed
- If "Auto Power Off" was enabled, waits for nozzle to cool below 50°C
- Printer powers off automatically
Project Page
3MF files downloaded from MakerWorld contain embedded project pages with model information. To view:
- Right-click any archive in the Archives page
- Select "Project Page" from the context menu
- View title, description, designer info, license, and images
- Click "Edit" to modify the project page metadata
- Changes are saved directly to the 3MF file
Smart Plug Integration
Bambusy supports Tasmota-based smart plugs for automated power control. This is useful for:
- Automatically turning on your printer when a print starts
- Safely turning off the printer after it cools down
- Energy savings by powering off idle printers
Supported Devices
Any smart plug running Tasmota firmware with HTTP API enabled. Popular compatible devices include:
- Sonoff S31 / S26
- Gosund / Teckin / Treatlife smart plugs
- Any ESP8266/ESP32-based plug with Tasmota
Setting Up a Smart Plug
- Go to Settings > Smart Plugs
- Click Add Plug
- Enter the plug's IP address and click Test to verify connection
- Give it a name (auto-filled from device if available)
- Optionally add username/password if your Tasmota requires authentication
- Link it to a printer for automation
- Click Add
Automation Options
Once linked to a printer, you can configure:
| Setting | Description |
|---|---|
| Enabled | Master toggle for all automation |
| Auto On | Turn on plug when a print starts |
| Auto Off | Turn off plug when print completes |
| Delay Mode | Choose how to delay the power-off |
Delay Modes:
- Time-based: Wait a fixed number of minutes (1-60) after print completes
- Temperature-based: Wait until nozzle temperature drops below threshold (default 70°C)
Manual Control
Each plug card shows:
- Current status (ON/OFF/Offline)
- On/Off buttons for manual control
- Expandable settings panel
Tech Stack
- Backend: Python / FastAPI
- Frontend: React / TypeScript / Tailwind CSS
- Database: SQLite
- 3D Viewer: Three.js
- Printer Communication: MQTT (TLS) + FTPS
Project Structure
bambusy/
├── backend/
│   └── app/
│       ├── api/routes/      # API endpoints
│       ├── core/            # Config, database
│       ├── models/          # SQLAlchemy models
│       ├── schemas/         # Pydantic schemas
│       └── services/        # Business logic (MQTT, FTP, etc.)
├── frontend/                # React application
├── static/                  # Built frontend + images
├── archive/                 # Stored 3MF files
└── bambusy.db              # SQLite database
API Documentation
Once running, API documentation is available at:
- Swagger UI: http://localhost:8000/docs
- ReDoc: http://localhost:8000/redoc
Contributing
Contributions are welcome! Please feel free to submit a Pull Request.
- Fork the repository
- Create your feature branch (
git checkout -b feature/AmazingFeature) - Commit your changes (
git commit -m 'Add some AmazingFeature') - Push to the branch (
git push origin feature/AmazingFeature) - Open a Pull Request
Troubleshooting
Printer won't connect
- Check LAN Mode is enabled on your printer (Settings > Network > LAN Mode)
- Verify the Access Code - it changes when you toggle LAN Mode
- Check network connectivity - printer and server must be on the same network
- Firewall issues - ensure ports 8883 (MQTT) and 990 (FTPS) are not blocked
- Correct Serial Number - find it in printer settings under Device Info
"Connection refused" errors
- The printer may be in sleep mode - wake it up and try again
- Check if another application is connected (only one MQTT connection allowed)
- Restart the printer if issues persist
3MF files not archiving automatically
- Ensure the printer is connected (green status indicator)
- Check that the print completed successfully
- Look at the server logs for any error messages
Frontend not loading
- Make sure you built the frontend:
cd frontend && npm run build - Check that the
/staticfolder containsindex.htmland/assets - Clear browser cache and hard refresh (Ctrl+Shift+R)
Database errors
The SQLite database (bambusy.db) is created automatically. If you encounter issues:
# Backup and reset database
mv bambusy.db bambusy.db.backup
# Restart the application - a new database will be created
View server logs
Bambusy writes logs to bambutrack.log in the application directory (rotating, max 5MB × 3 files).
# View live log file
tail -f bambutrack.log

# If running directly with verbose output
uvicorn backend.app.main:app --host 0.0.0.0 --port 8000 --log-level debug

# If running as systemd service
sudo journalctl -u bambusy -f
Smart plug not responding
- Check the IP address - Make sure the plug is on the same network and the IP hasn't changed
- Test via browser - Visit
http://<plug-ip>/cm?cmnd=Powerto test directly - Check Tasmota web interface - Access
http://<plug-ip>to verify Tasmota is running - Authentication - If Tasmota has a password set, configure it in the plug settings
- Firewall - Ensure port 80 is accessible between Bambusy server and the plug
Auto power-off not working
- Check plug is linked - The plug must be linked to a printer for automation
- Verify automation is enabled - Check the Enabled, Auto On, and Auto Off toggles
- Temperature mode issues - If using temperature mode, ensure the printer is still connected so Bambusy can read the nozzle temperature
Scheduled print not starting
- Check printer connection - The printer must be able to connect after power-on
- Verify smart plug - If using auto power-on, ensure the smart plug is configured and working
- Check queue status - Look at the queue page for error messages
- Time zone issues - Scheduled times are in your local time zone; ensure your system clock is correct
- View logs - Check
bambutrack.logfor detailed error messages
Print queue shows "Failed to start"
Common causes:
- Printer not ready - The printer needs to be idle and connected
- File upload failed - Check FTP connectivity to the printer
- HMS errors - Check the printer for any health system errors that prevent printing
Timelapse not attaching automatically
The Problem: When printers run in LAN-only mode (disconnected from Bambu Cloud), they cannot sync time via NTP. This causes the printer's internal clock to drift significantly (sometimes days or weeks off). Bambusy matches timelapses by comparing the print completion time with the timelapse file's modification time - when the printer's clock is wrong, this matching fails.
Symptoms:
- "Scan for Timelapse" shows "No matching timelapse found"
- Timelapse files exist on the printer but don't auto-attach
- Printer shows incorrect date/time in its settings
Workaround - Manual Selection: When automatic matching fails, Bambusy now offers manual timelapse selection:
- Right-click the archive and select "Scan for Timelapse"
- If no match is found, a dialog appears showing all available timelapse files on the printer
- Files are sorted by date (newest first) with size information
- Select the correct timelapse and click to attach it
Permanent Fix: To fix the printer's clock:
- Temporarily connect the printer to the internet (via router or mobile hotspot)
- Wait for the printer to sync time via NTP
- Return to LAN-only mode - the clock should remain accurate until the next power cycle
Note: Some users report the clock resets after power cycling. In this case, you'll need to either:
- Periodically connect to the internet to sync time
- Use the manual timelapse selection feature
Known Issues / Roadmap
Beta Limitations
- Docker support not yet available
- No user authentication (single-user only)
- Limited to local network printers
Planned Features
- Timelapse video integration
- Smart plug integration (Tasmota)
- Print time accuracy tracking
- Duplicate detection
- HMS error monitoring
- MQTT debug logging
- Embedded project page editor
- QR code labels
- Energy monitoring and statistics
- Print scheduling and queuing
- Automatic finish photo capture
- Maintenance tracker
- Notifications (email, push)
- Mobile-optimized UI
License
This project is licensed under the MIT License - see the LICENSE file for details.
Acknowledgments
- Bambu Lab for making great printers
- The reverse engineering community for documenting the Bambu Lab protocol
- All contributors and testers
Made with ❤️ for the 3D printing community